This checklist takes you from nothing to a finished MiniMax H3 clip with sound, using ComfyUI's own Image to Video template. Each step says what to do and why, with a picture of ComfyUI where there is something to click.
Work through it in order the first time. After that, the troubleshooting table at the end is the part you will come back to. For what each part of the template does, see MiniMax H3 in ComfyUI: what every part does.
A few words first
- Template: a ready-made workflow that ships with ComfyUI.
- Node: one box on ComfyUI's canvas; each does one job.
- Model file: a large file of learned numbers. H3 needs four.
- VRAM: the memory on your graphics card. RAM is your computer's main memory.
- Seed: the number that sets the random noise a clip starts from.
- Queue: ComfyUI's list of jobs waiting to run.
Before you start
1. Check your machine. This checklist assumes an NVIDIA card, since the default files' 8-bit and 4-bit formats are built around NVIDIA hardware.
- A card with 16 GB of VRAM or more; 24 or 32 GB is more comfortable.
- 64 GB of RAM for the default files. It matters as much as the card; Running H3 on 16, 24 and 32 GB cards explains why.
- About 50 GB of free disk. A fast SSD shortens the first load.
2. Update ComfyUI. ComfyUI's documentation gives the minimum versions: 0.30.0 for the text, image and reference templates; 0.34.0 for Multiframe Reference; 0.35.0 for the ControlNet add-on and sparse attention; 0.36.0 for FastH3. Older versions show red, missing nodes.
3. Check your PyTorch build. PyTorch is the library ComfyUI runs on. The card of ComfyUI's H3 files recommends the default int8_convrot video model when PyTorch is built for CUDA 13.0. ComfyUI prints the PyTorch version in its console at start-up; look for cu130. If you cannot run a cu130 build, use the fp8_scaled video model instead.
4. Read the licence. H3's weights come under the MiniMax H3 Community License, with regional terms and terms for commercial use. ComfyUI's page says commercial use of locally made output needs a MiniMax commercial licence. Read both before you publish anything.
Open the template
5. Find the template. Click Templates in the left-hand bar. Narrow the list with the two filters, then click the Image to Video card.
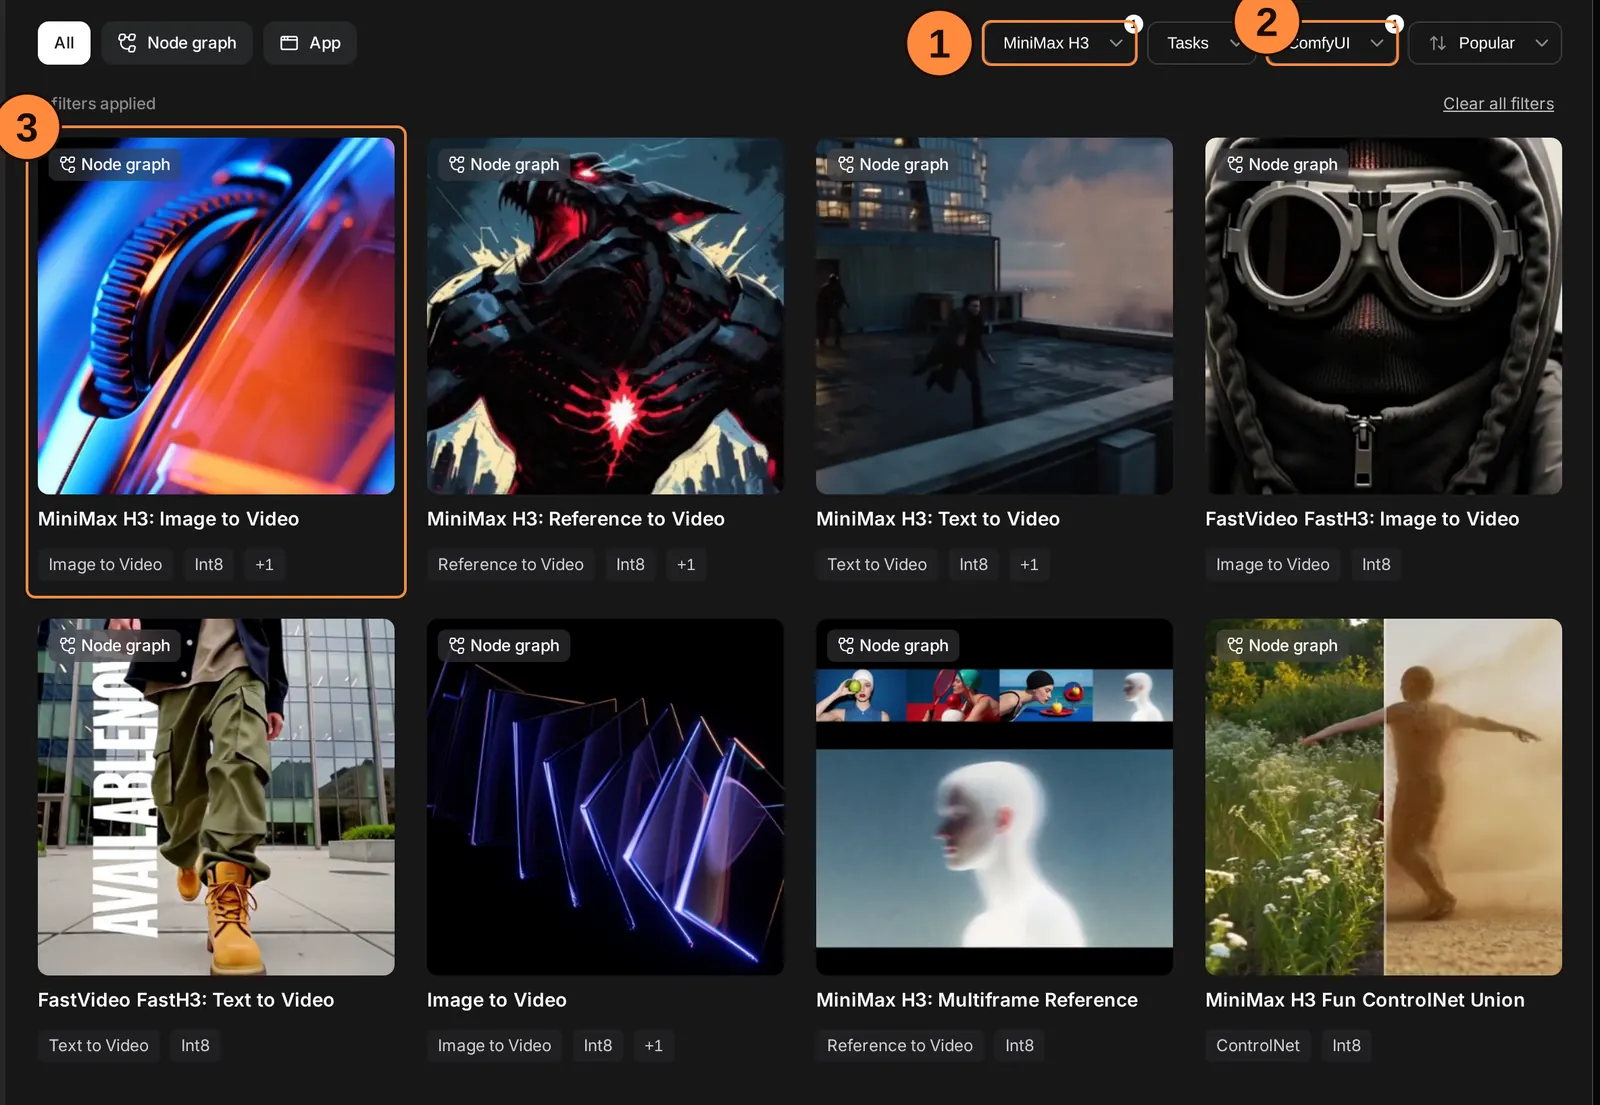
- Model Filter: tick MiniMax H3.
- Runs on: tick ComfyUI. This hides versions that run on MiniMax's paid online service.
- MiniMax H3: Image to Video is the card to click. It opens the workflow on the canvas.
Typing "MiniMax H3" in the search box works too, though other models' templates are mixed into the results.
Get the files
6. Let ComfyUI tell you what is missing. When a template needs a file your machine does not have, ComfyUI says "errors found" in a pop-up. Click View details, or the Issues tab of the right-hand panel.
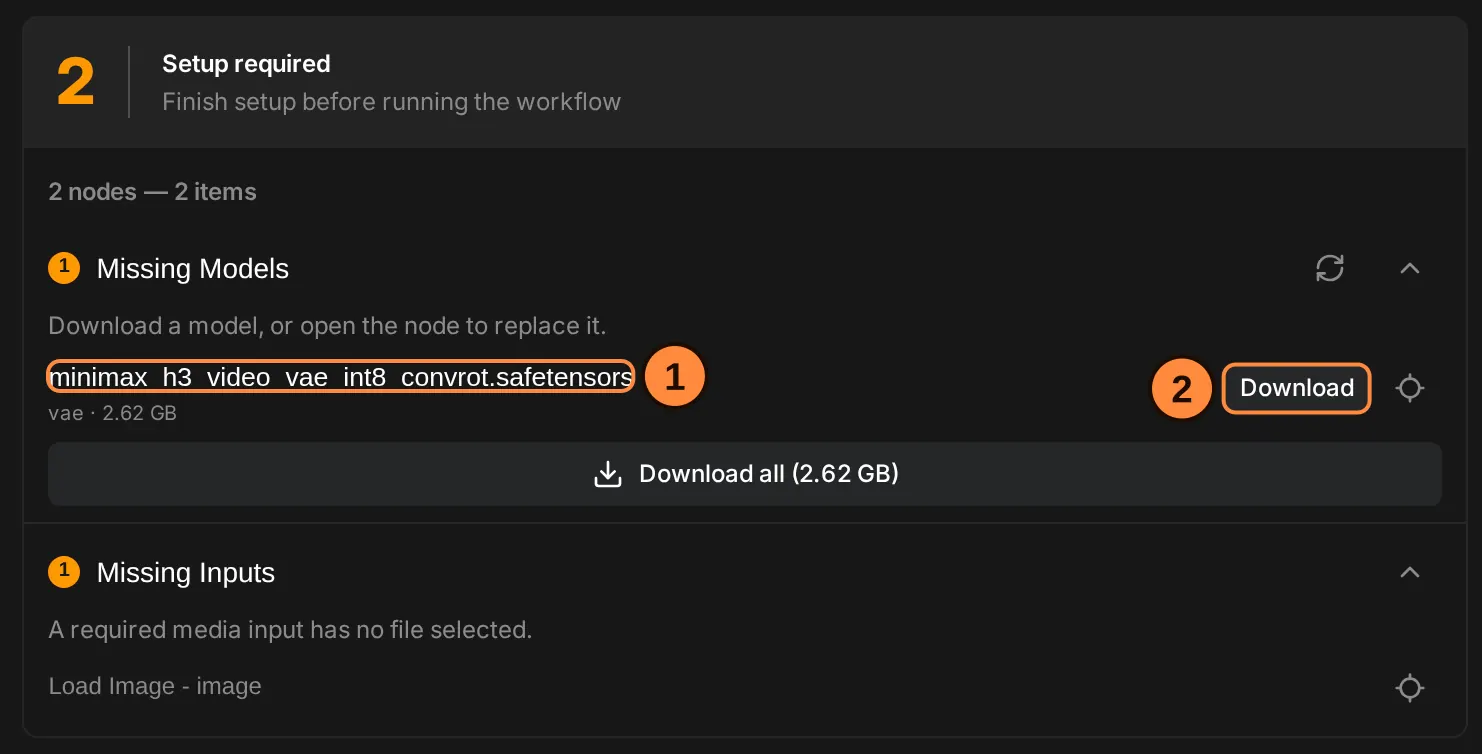
- The missing file's name. The line under it gives the folder it belongs in (here
vae) and its size. - Download fetches that file, and Download all every missing file at once. If a file lands in your browser's Downloads folder, move it into the folder named under it.
ComfyUI shows sizes in binary gigabytes, which are about 7% larger than the decimal ones on Hugging Face: the 2.81 GB file shows as 2.62 GB. "Missing Inputs" means the template's sample picture is not on your machine; step 8 replaces it.
7. Or download the files yourself from ComfyUI's repository, Comfy-Org/MiniMax-H3, into ComfyUI's models folder. The template's own note, at the left of the canvas, lists every file and its folder.
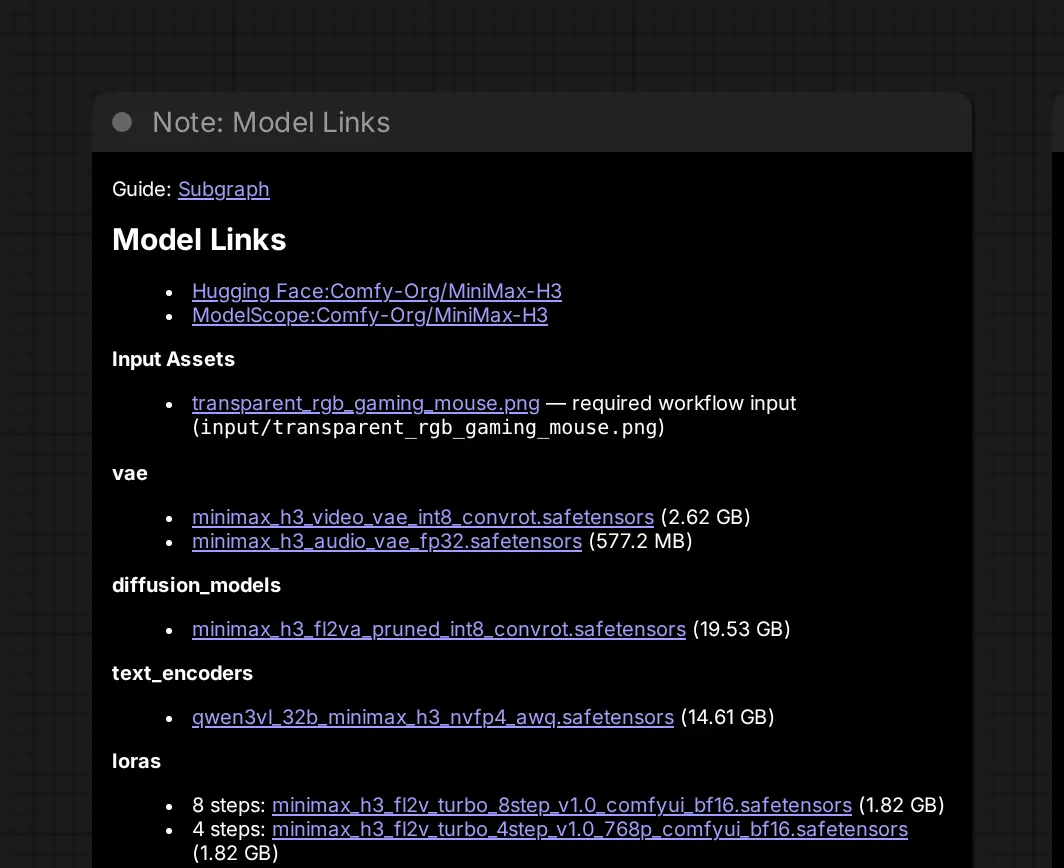
| Folder | File | Size |
|---|---|---|
diffusion_models | minimax_h3_fl2va_pruned_int8_convrot.safetensors | 21.0 GB |
text_encoders | qwen3vl_32b_minimax_h3_nvfp4_awq.safetensors | 15.7 GB |
vae | minimax_h3_video_vae_int8_convrot.safetensors (or the 5.2 GB fp16 one) | 2.8 GB |
vae | minimax_h3_audio_vae_fp32.safetensors | 0.6 GB |
Restart ComfyUI, or press the refresh arrows beside Missing Models, so it sees new files. The fl2va video model covers text-only and first-frame clips; reference clips need the ref2va file (H3's modes explained). H3 model file names decoded covers the other sizes.
Set up the workflow
8. Choose your start picture. Click "choose file to upload" on the Load Image node. This picture becomes frame 1, and the text encoder reads it too.
- Use the clip's own shape (9:16 for upright, 16:9 for wide), so nothing is cropped or stretched.
- Make it at least 768 pixels on its short side.
- Choose a clear, well-lit picture with the subject readable at a glance.
9. Set the numbers. For a first run, change only these:
| Setting | First run |
|---|---|
Resolution Selector, megapixels | 0.98 (1344 × 768 or 768 × 1344) |
duration | 5 seconds |
turbo_mode | off (20 steps) |
noise_seed | any number, fixed |
Leave the sampler (res_multistep), scheduler (simple) and CFG (1) as they are. The settings guide shows where each one is and when to change it.
Write the prompt
10. Write the prompt in the shape H3 was trained on. MiniMax's open prompt-writing guide describes the structure. For a clip from a start picture:
- One opening line that says your picture is frame 1, then a blank line.
integrated_multimodal_description:the shot or shots. The first opens with the style and what is in the picture, then the action. A speaker gets an ID like(S1), and spoken words go inside<d>[English] … </d>.overall_soundscape:one to four sentences of sound.non_diegetic_music:the score, orN/A.
An example for a picture of a barista behind a café counter:
For the target video, at 0.00 seconds into the target video, <Picture 1> (from [Shot 1]) is fully referenced.

integrated_multimodal_description: [Shot 1] Live-action, a medium shot at eye level frames a barista in a grey apron behind the counter of a small café, an espresso machine at the left of the frame and a shelf of white cups behind him. (S1) locks the handle into the machine, presses the button and looks up into the camera, saying: <d>[English] Two minutes, and it's yours.</d> The first drops of coffee fall into the cup as steam rises from the machine. The camera holds a static shot.
overall_soundscape: The steady hiss of the espresso machine over the low murmur of a quiet café, with a cup set down on a saucer near the end.
non_diegetic_music: N/A- Describe what is there, never what is not. "The counter is bare" works; "no cups on the counter" invites cups.
- Say the spoken words exactly inside the
<d>tags, and nothing else in them. - Name the camera move, or say the camera holds a static shot.
- For a cut, start a new shot:
[Shot 2] At 00:03.000, the camera cuts to …, each cut later than the one before and inside the clip.
Run it
11. Press Run. It is at the top right of the screen.
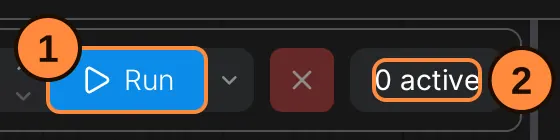
- Run adds the workflow to the queue. A warning sign on the button means the Issues panel still lists something to fix.
- The job counter shows how many jobs are running or waiting; it reads "0 active" when nothing is.
The first run loads every model file and is the slowest; later runs reuse what is loaded. ComfyUI's console shows a step counter while the clip is made.
12. Find the clip. The Save Video node, to the right of the main box, writes the MP4.

- filename_prefix is
video/MiniMax_H3: the clip goes into thevideofolder inside ComfyUI'soutputfolder, named MiniMax_H3 with a number added for each new clip. The clip also plays in the node itself.
13. Watch it with sound, at full size. Check, in this order:
- Does the clip start exactly on your picture?
- Does the action happen, in the order you wrote it?
- Do the lips match the words, and are they the words you wrote?
- Does the sound fit what is on screen?
- Do faces, hands and fine patterns hold steady as things move?
14. Change one thing at a time. Keep the seed fixed while you adjust the prompt, so any difference comes from your change. When the prompt is right, try three or four seeds and keep the best. Speed-ups (turbo mode, fewer megapixels) render faster, at ComfyUI's stated cost in motion and sound; a faster version of a clip is a different clip, not a preview of the same one.
Troubleshooting
| What you see | Likely cause | What to do |
|---|---|---|
| Red nodes when the workflow opens | ComfyUI too old, or a node failed to load | Update ComfyUI; read the start-up console for errors |
| A file row shows no file | The file is in the wrong folder or renamed | Check the folders in step 7; refresh |
| Out of memory | The clip is too big for the card | Lower the megapixels or the length; close other programs |
| Renders take many times longer than expected | The files do not fit in RAM and are read from disk | Add up your file sizes against your RAM |
| A black video with a bf16 model | A bug reported against older ComfyUI versions | Update ComfyUI, or use the int8_convrot file |
| A LoRA logs "shape mismatch" | It was made for the unpruned model | Look for a pruned build of the LoRA |
| Shapes morph near the end | 8-bit attention, such as Sage Attention | Turn it off and compare at the same seed |
| Fine patterns shimmer in a grid | Too few steps for the detail | Raise the steps towards 30 to 50 |
| A reference barely shows at 4 steps | Speed-ups at 4 steps weaken references | Turn the speed-up off for that shot |
| The voice sounds rough | Too few steps for the sound | Use 12 steps or more; 20 is the default |
| No sound, or sound but no picture | A decoder wired to the wrong side | Connect the video decoder to video and the audio decoder to audio |
Once this works, H3's modes explained shows what else the same files can do.
Sources: ComfyUI's H3 tutorial and native workflow page; MiniMax's H3 model card and its base prompt-writing guide; the file listing of Comfy-Org/MiniMax-H3; ComfyUI issue 15563 (black frames with bf16 files). Screenshots: ComfyUI 0.39.2's own template browser, Issues panel and top bar, and its stock "MiniMax H3: Image to Video" template, labels added.