MiniMax H3 is an open video model that makes a short clip with stereo sound from a few lines of text. You can also give it a picture to start from. It runs inside ComfyUI on one graphics card.
This guide is for you if you have installed ComfyUI but have never run a video model. It opens ComfyUI's own H3 template and goes through it one part at a time, with a picture of each part.
A few words first
ComfyUI has its own words. These are the ones this guide uses.
- Canvas: ComfyUI's main work area, the large dark space in the middle of the screen.
- Workflow: a set of boxes joined by wires on the canvas. It describes one job from start to finish.
- Node: one box on the canvas. Each node does one thing, such as loading a file or saving a video.
- Wire: a line from one node to another. It carries a result from the first node into the second.
- Template: a ready-made workflow that ships with ComfyUI. You open it, choose your files and press Run.
- Model file: a large file of learned numbers that does the real work. H3 needs four of them.
- Prompt: the words you write to describe the clip you want.
The whole job in one picture
This is the path from your prompt to a finished clip.
- You write a prompt. You can also choose a picture to be the clip's first frame.
- The text encoder reads your words and your picture. It turns them into numbers that steer the video model.
- The video model starts from random noise. Step by step, the sampler has it clean that noise into a clip that matches your prompt. It makes the picture and the sound together.
- The model works on a small, compressed version of the clip. Two decoders expand it at the end: one into frames, one into sound.
- ComfyUI joins the frames and the sound and saves an MP4 file.
Only step 3 repeats, about 20 times, so it takes most of the time.
Open the template
ComfyUI ships a ready-made H3 workflow. Click Templates in the left-hand bar, type "MiniMax H3" in the search box and click MiniMax H3: Image to Video. If ComfyUI says model files are missing, it offers to download them for you. Click any screenshot below to open it at full size.
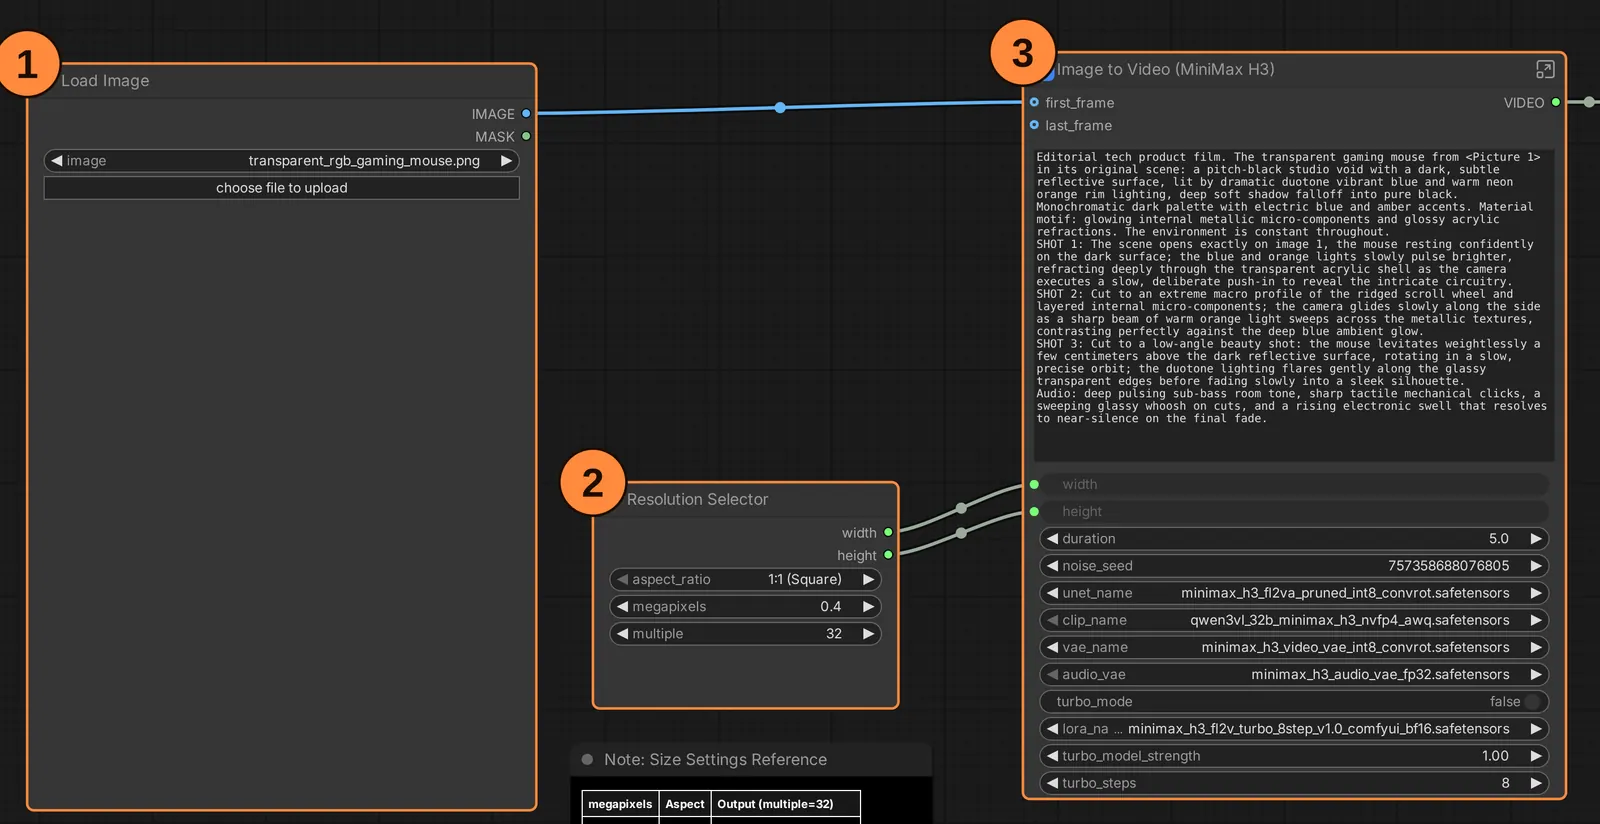
- Load Image holds your start picture. Click "choose file to upload" to pick one. It becomes the clip's first frame.
- Resolution Selector sets the clip's width and height from a shape (the aspect ratio, such as 16:9) and a size in megapixels. The note under it lists the exact sizes each choice gives.
- Image to Video (MiniMax H3) is the main box. It is a subgraph: one node with more nodes inside. Its outside shows the settings you are likely to change; the icon in its top-right corner opens it.
The finished clip goes to a Save Video node to the right of the main box, which writes the MP4 file.
The settings on the main box
Most of what you change lives on the outside of the main box.
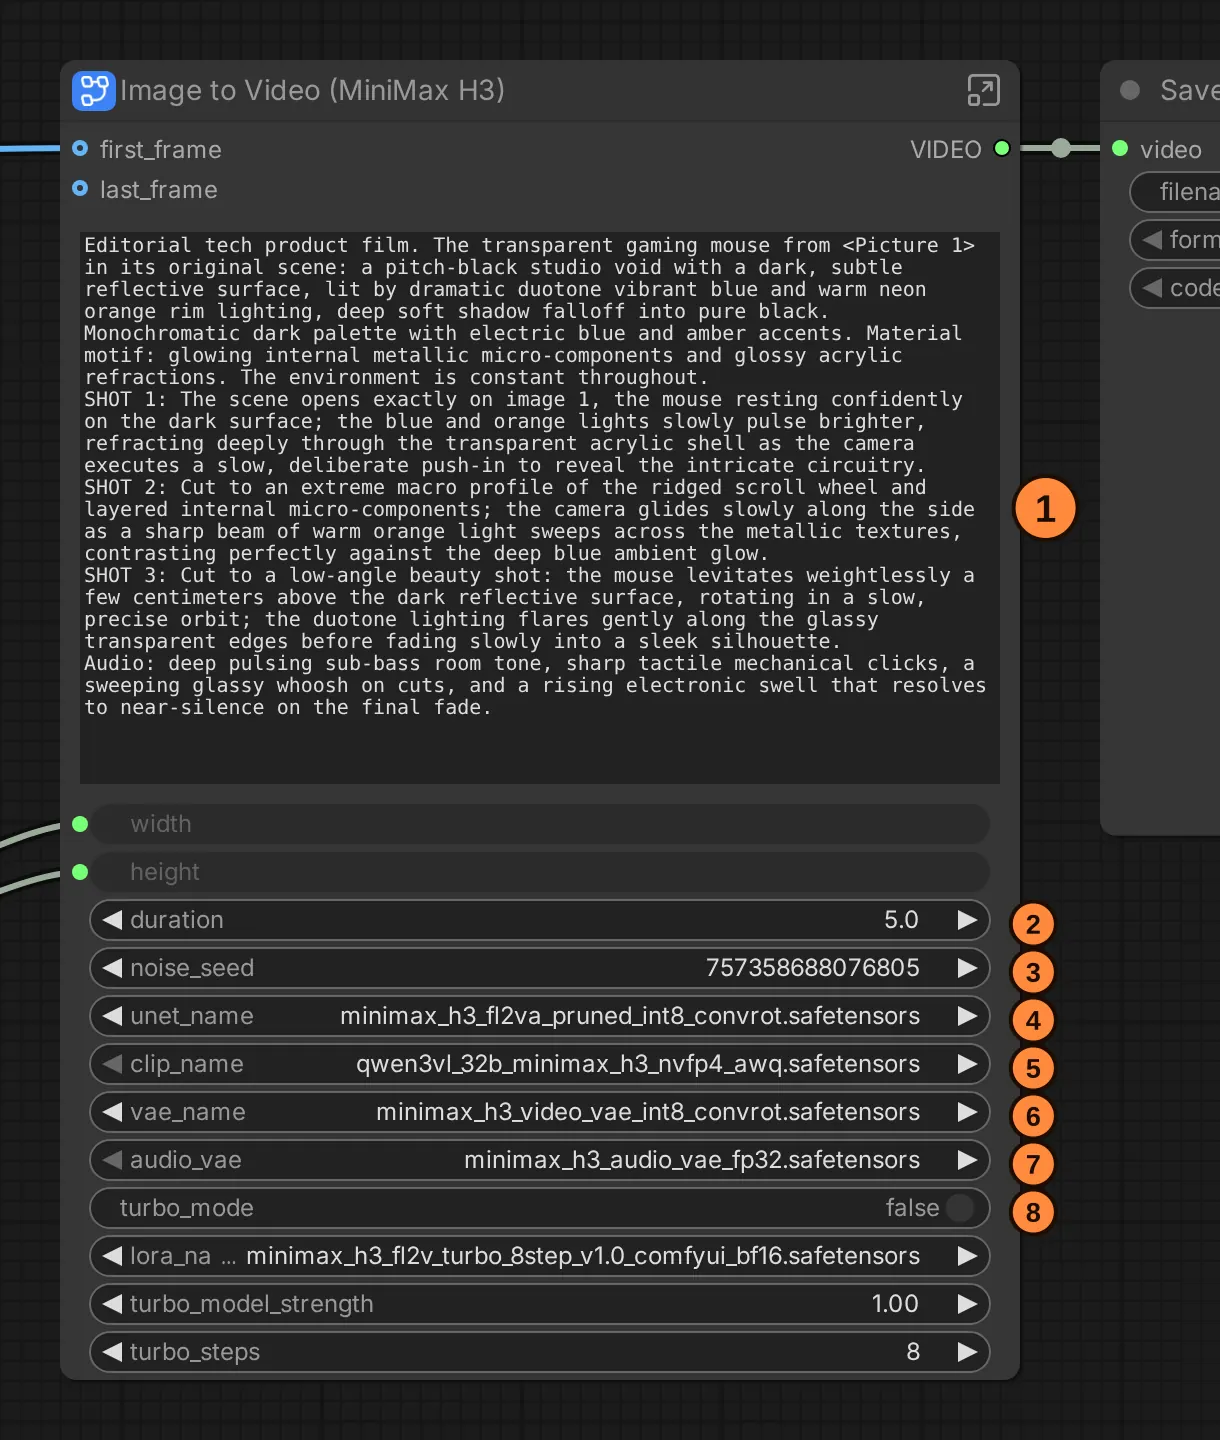
- The prompt. The large text field. The template comes with a sample prompt that you replace with your own.
- duration is the clip's length in seconds. H3 makes clips of 4 to 15 seconds; the template starts at 5.
- noise_seed picks the random noise the clip starts from. The same seed with the same settings gives the same clip again. A new seed gives a new version.
- unet_name is the video model file.
- clip_name is the text encoder file. ComfyUI's loader for text encoders is called the CLIP loader, after an older kind of encoder, so the name stuck.
- vae_name is the video decoder file.
- audio_vae is the audio decoder file.
- turbo_mode switches on a speed-up file (a LoRA, explained below) and lowers the step count. The three rows under it choose that file, its strength and its steps.
The video model
The video model is the part that makes the clip. It is the largest file and the one that runs at every step.
MiniMax's model card describes it as a single model of about 33 billion parameters (the learned numbers inside it). It handles picture and sound in one stream rather than in two separate networks. That is why footsteps land when the feet do, and a voice matches the lips.
There are two versions, and you choose by task:
- FL2VA makes a clip from text alone, or from a first frame, a last frame or both. The Image to Video template uses this one.
- Ref2VA builds a new clip around reference pictures, video or sound.
H3's modes explained covers when to use which.
The detail: the full release is about 66 GB. ComfyUI's own copies are smaller in two ways. "Pruned" files leave out a block of weights that can be worked out in advance (about 13 billion parameters, by MiniMax's description). "Quantised" files store each number in fewer bits (8, 6 or 4 instead of 16), which makes the file smaller at a small cost in precision. The template's default, minimax_h3_fl2va_pruned_int8_convrot.safetensors, is about 21 GB. H3 model file names decoded explains every part of these names and which file suits which card.
The weights are also "CFG-distilled". CFG is a setting that makes many models follow the prompt more strongly. H3 has that built in, so CFG stays at 1, and a negative prompt (things to avoid) does nothing in the template. The H3 settings guide covers the settings that do matter.
The text encoder
The text encoder reads your prompt and your picture and turns them into numbers the video model can follow.
H3 uses Qwen3-VL-32B for this, a vision-language model: it understands pictures as well as words. Two things follow from that.
- It sees your start picture too. A clear, well-lit start picture helps the whole clip, not only the first frame.
- It is large but cheap to run. It runs once for each new prompt or picture, not at every step. If you change only the seed and render again, ComfyUI reuses its last answer.
The detail: H3 reads the encoder's output from layer 50 of its 64 layers, so ComfyUI ships only the first 50 layers. That is why the full-precision file is 51.5 GB rather than the complete model's 66.7 GB. Three sizes are offered: bf16, the full 16 bits (51.5 GB), 8-bit int8_convrot (27.1 GB) and 4-bit nvfp4_awq (15.7 GB). The template loads the 4-bit file, and ComfyUI notes that this file does not need a Blackwell card (NVIDIA's RTX 50 series). Whether the 4-bit file costs quality is debated, and no maker has published a comparison.
The sampler: where the time goes
The sampler runs the video model again and again, removing a little noise each time, until the clip is clean. Open the main box to see it.
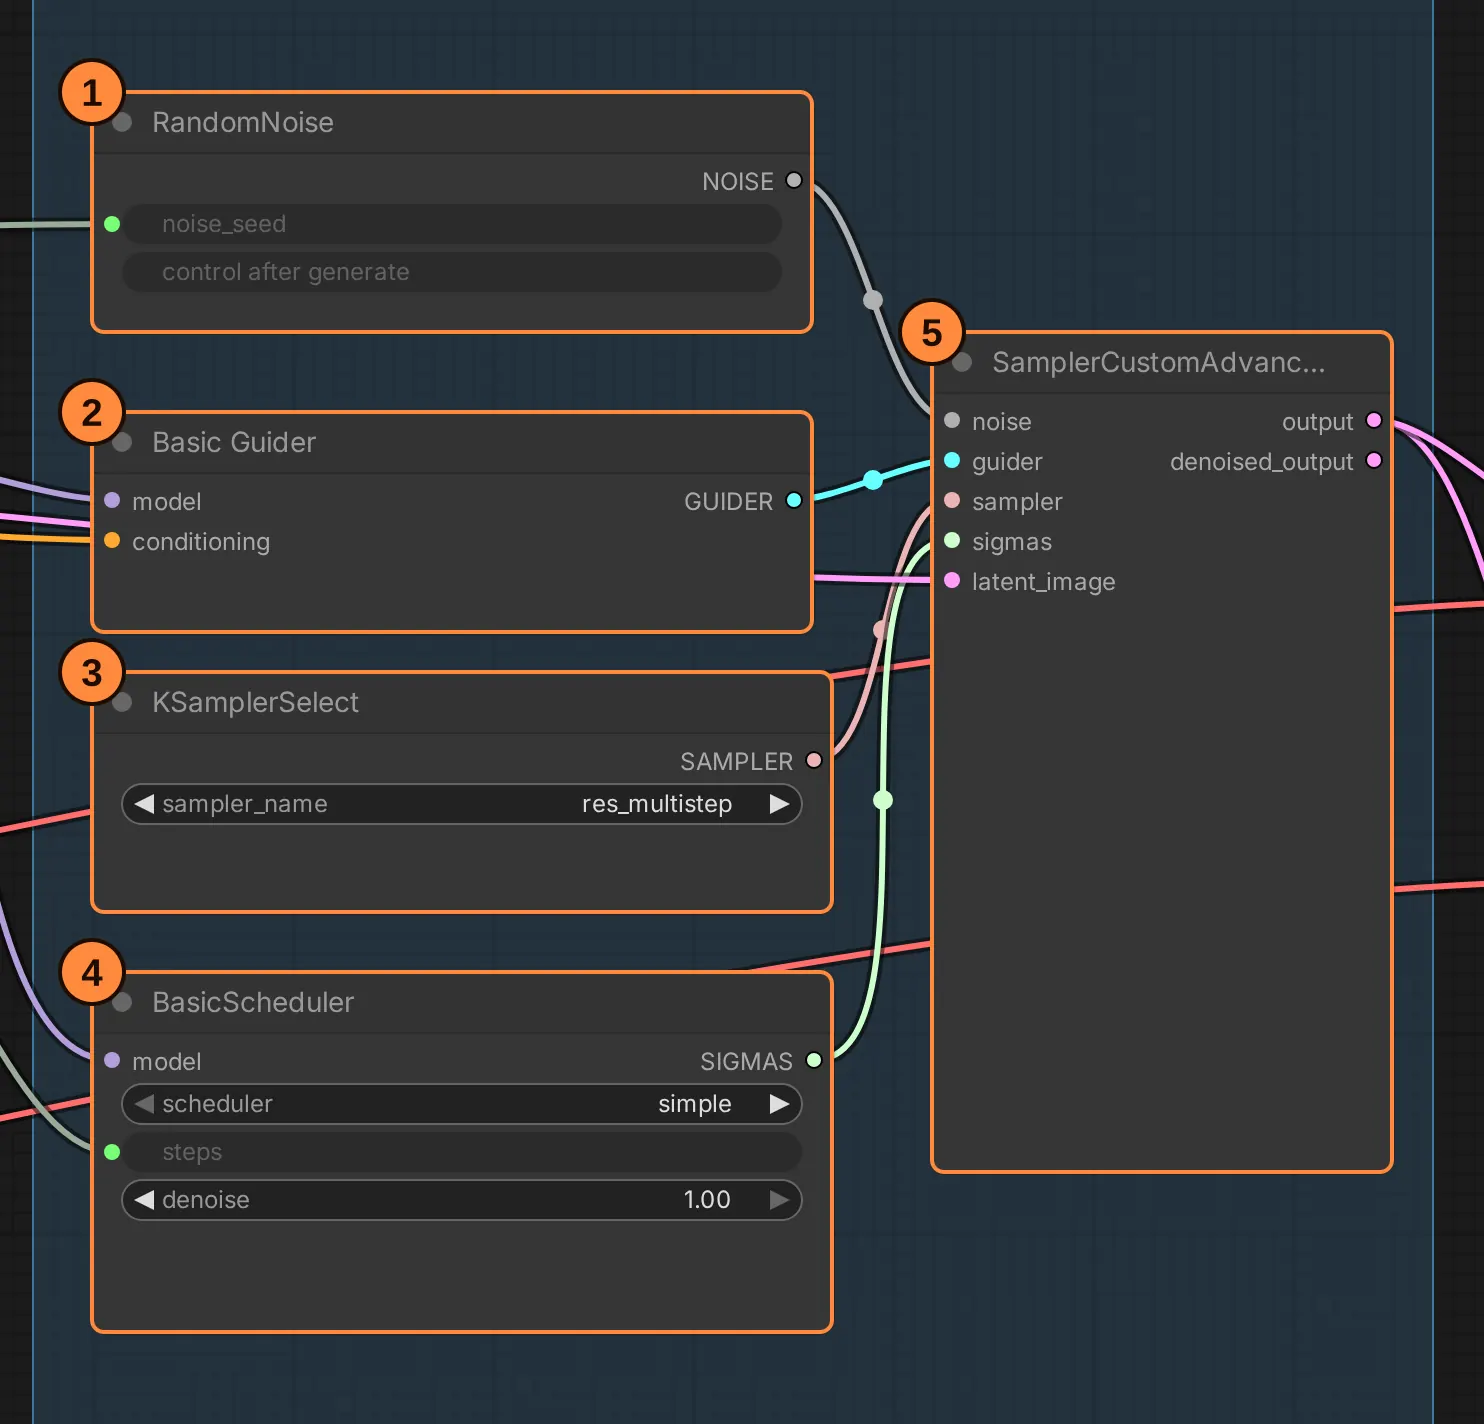
- RandomNoise makes the starting noise from the seed you set outside.
- Basic Guider joins the video model and your encoded prompt. It needs no negative prompt, because H3 has CFG built in.
- KSamplerSelect chooses the method that removes the noise. The template uses
res_multistep, which reuses its estimate from the step before, so 20 steps go further. - BasicScheduler decides how much noise is left after each step. The template uses the
simpleschedule and takes its step count from outside: 20, or the turbo steps when turbo mode is on. - SamplerCustomAdvanced runs the loop. Its output is still the compressed clip, which the decoders expand next.
The detail: a setting called shift spends more steps at high noise, where layout and motion are decided. ComfyUI already sets H3's shift (12 for video, 3 for audio), so the template has no shift node. You add one (ModelSamplingMiniMaxH3) only when a speed-up file asks for other values. The settings guide explains when to raise the steps and which schedules to avoid.
The two decoders
The decoders turn the model's compressed result into real frames and real sound. ComfyUI calls each one a VAE (a variational autoencoder: a network that compresses and expands).
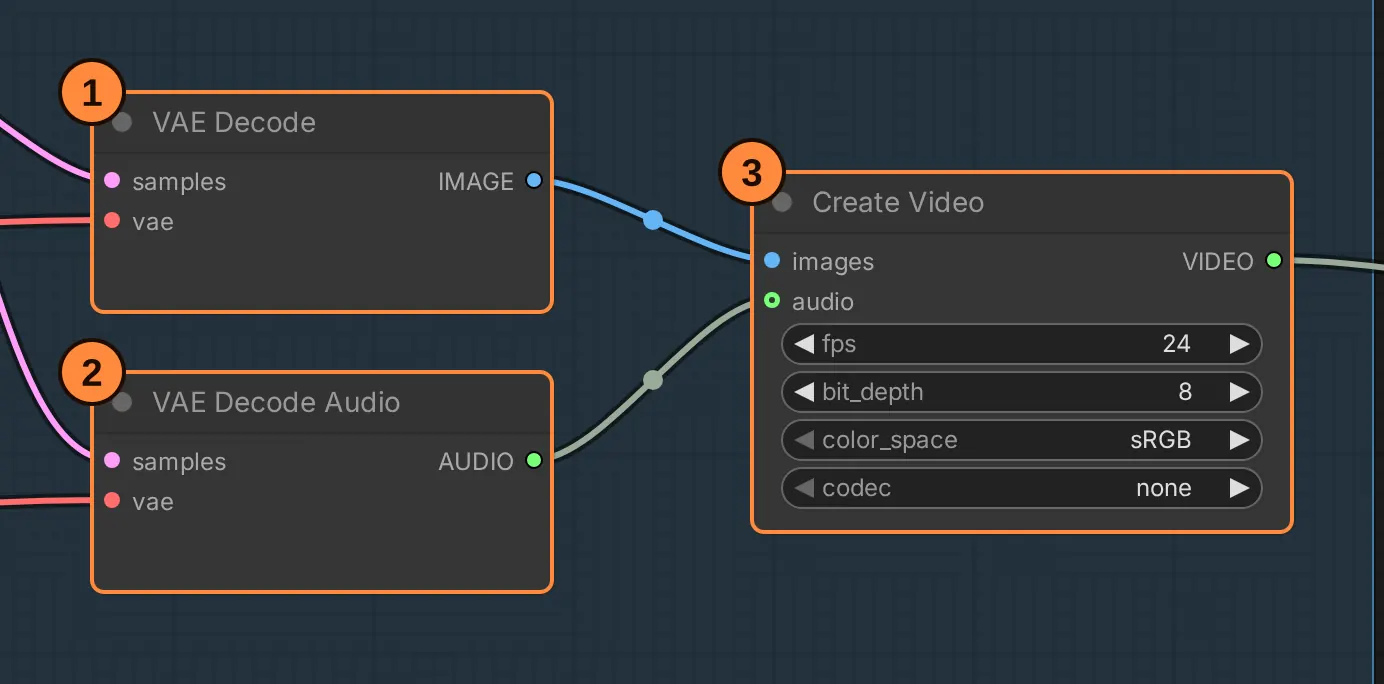
- VAE Decode turns the compressed frames into full-size pictures, using the video decoder.
- VAE Decode Audio turns the compressed sound into a stereo track, using the audio decoder.
- Create Video joins the two at 24 frames a second. Its result leaves the main box for Save Video.
The video decoder also works the other way at the start: it compresses your start picture so the model can begin from it.
The detail: by the model card, the compressed clip is 16 times smaller than the real one in width and in height, and has 4 times fewer frames. Two video decoder files are common: minimax_h3_video_vae_fp16.safetensors (5.2 GB), at the precision of MiniMax's own code, and the template's 8-bit default (2.8 GB), which is faster. Reports on the 8-bit file's look are mixed, so fp16 is the safe choice if you have the memory. The audio decoder is one file, minimax_h3_audio_vae_fp32.safetensors (0.6 GB), for 32 kHz sound. Both go in ComfyUI's vae folder. If you build your own workflow and the clip comes out silent, check that the audio decoder is wired to the audio_vae inputs.
Speed-up LoRAs and other add-ons
A LoRA is a small add-on file that adjusts the video model. For H3, the most useful are speed-up LoRAs, trained to give a usable clip in 4 or 8 steps instead of 20.
That is what the template's turbo mode loads. ComfyUI ships three made by the lightx2v team: an 8-step and a 4-step LoRA for FL2VA, and a 4-step LoRA for Ref2VA. ComfyUI's own page names the cost: slightly lower audio and motion quality, and at 4 steps a reference can end up barely applied.
Before loading a LoRA from the community, check two things:
- Was it trained on a pruned or a full model? A LoRA that adjusts weights a pruned file left out cannot apply that part. ComfyUI reports a shape mismatch and skips it.
- What strength, steps and sampler does its author use? Read its page first.
Two add-ons go further:
- Fun ControlNet Union (by Alibaba's PAI team) steers a clip with a guide video: edges, lines, depth or a pose skeleton. It needs ComfyUI 0.35 or newer.
- Multiframe guides: the
MiniMaxH3AddGuidenode pins a picture at any frame inside the clip, not only the first or last. It needs ComfyUI 0.34 or newer.
What the open release leaves out
MiniMax's model card names two parts of its own service that are not in the open files.
- H3-Context-IR rewrites your prompt into the structure the model was trained on, which MiniMax calls critical to quality. It is a paid service, not open weights. MiniMax's prompt-writing guide describes that structure so you can write it yourself; the first-video checklist shows an example.
- H3-Regenerate-2K remakes a finished clip at 2K. Local clips come out with a 768-pixel short edge, and ComfyUI's documentation warns that enlarging a clip afterwards cannot add back detail the first pass left out.
Where to go next
- Not sure which file to download? Read H3 model file names decoded.
- Want to know what your card can do? Read Running H3 on 16, 24 and 32 GB cards.
- Want a clip on screen today? Go to Your first H3 video: a checklist.
Sources: MiniMax's H3 model card and prompt-writing guide, ComfyUI's H3 tutorial and native workflow page, and the file listing of Comfy-Org/MiniMax-H3. File sizes are the Hugging Face listing's, in decimal gigabytes, as of October 2026. Screenshots: ComfyUI's stock "MiniMax H3: Image to Video" template (ComfyUI 0.39.2), labels added.